A GPS camera quad for under £100! What's not to like?
I've been messing around with quadcopters for the past couple of years but started with a Hubsan X4. I quickly grew out of it for models which were faster and could carry better cameras, finally graduating to building my own frankenquads to my own specification.However when Hubsan released a brushed quadcopter with GPS for under £100 I couldn't resist. I didn't really know whether I'd find its sedate pace a bit dull but hey, GPS!
I've really loved the freedom of not worrying about losing orientation when it is a small dot in the sky but the one thing that has bugged me is the relatively poor camera quality. Even comparing it with my old X4 camera, it comes off badly. Worse, after just 6 flights I had a motor seize so returned it for a replacement. However the new one had an even worse camera.
Reading the discussions on rcgroups, it wasn't uncommon to have focusing problems or a green hue. I had both. My options were to take it apart and try to refocus the lens or purchase a replacement. At best, I'd end up with something like my original - not that great.
I'd love to get quality like my Mobius or a Runcam but at around 40 grams these action cameras are too heavy. Also the processing required to encode x264 means they get hot and interfere with GPS reception. While thinking about trying a 808 #16, I discovered the Mate808 and decided this was worth trying to squeeze into the H502E.
I considered trying to keep the remote control function to start and stop the video but the connector from the main board was too small for any of my test equipment so I opted for buttons on the side of the quad. I only ever video the whole flight so this isn't really a loss for me. I expected the control circuity to be simple enough that a transistor circuit could handle the switching of the Mate808 but this will remain a project for another day.

The tiny Mate808 camera.
Pros.
Lightweight - without the battery and case it weighs only 6 grams.Energy efficient - consumes around 100ma at 4 volts when recording.
Small - the pcb measures 45mm x 34mm.
Cool - not even warm to the touch when recording.
Proper latching card slot.
Cons.
Quality - it isn't on a par with something like a Mobius, but it is much better than the native camera. Chuck Lohr says "For video, the sensor image 1600x1200 is cropped to 1600x900. Then it is up-scaled to 1920x1080".Large data rate - a little under 4 minutes 20 seconds consumes 1GB.
The Mate808 has 2 lens options, 70 and 120 degree variants. I opted for the 70 due to worries about not fitting the lens into the H502E lens holder. Also the wide angle lens is hot glued and although a caseless version is available, I would have to wait for the slow boat from China. The 70 degree version in a case is available on Amazon.co.uk for next day delivery. No contest.
Installation.
After removing the 20 screws in the arms we can start to disassemble the quad.Pull the case apart near the motors and work your way towards the body, using something like a credit card to carefully separate the plastic catches.
Remove the 2 plugs connecting the GPS board and then the top casing can be removed.


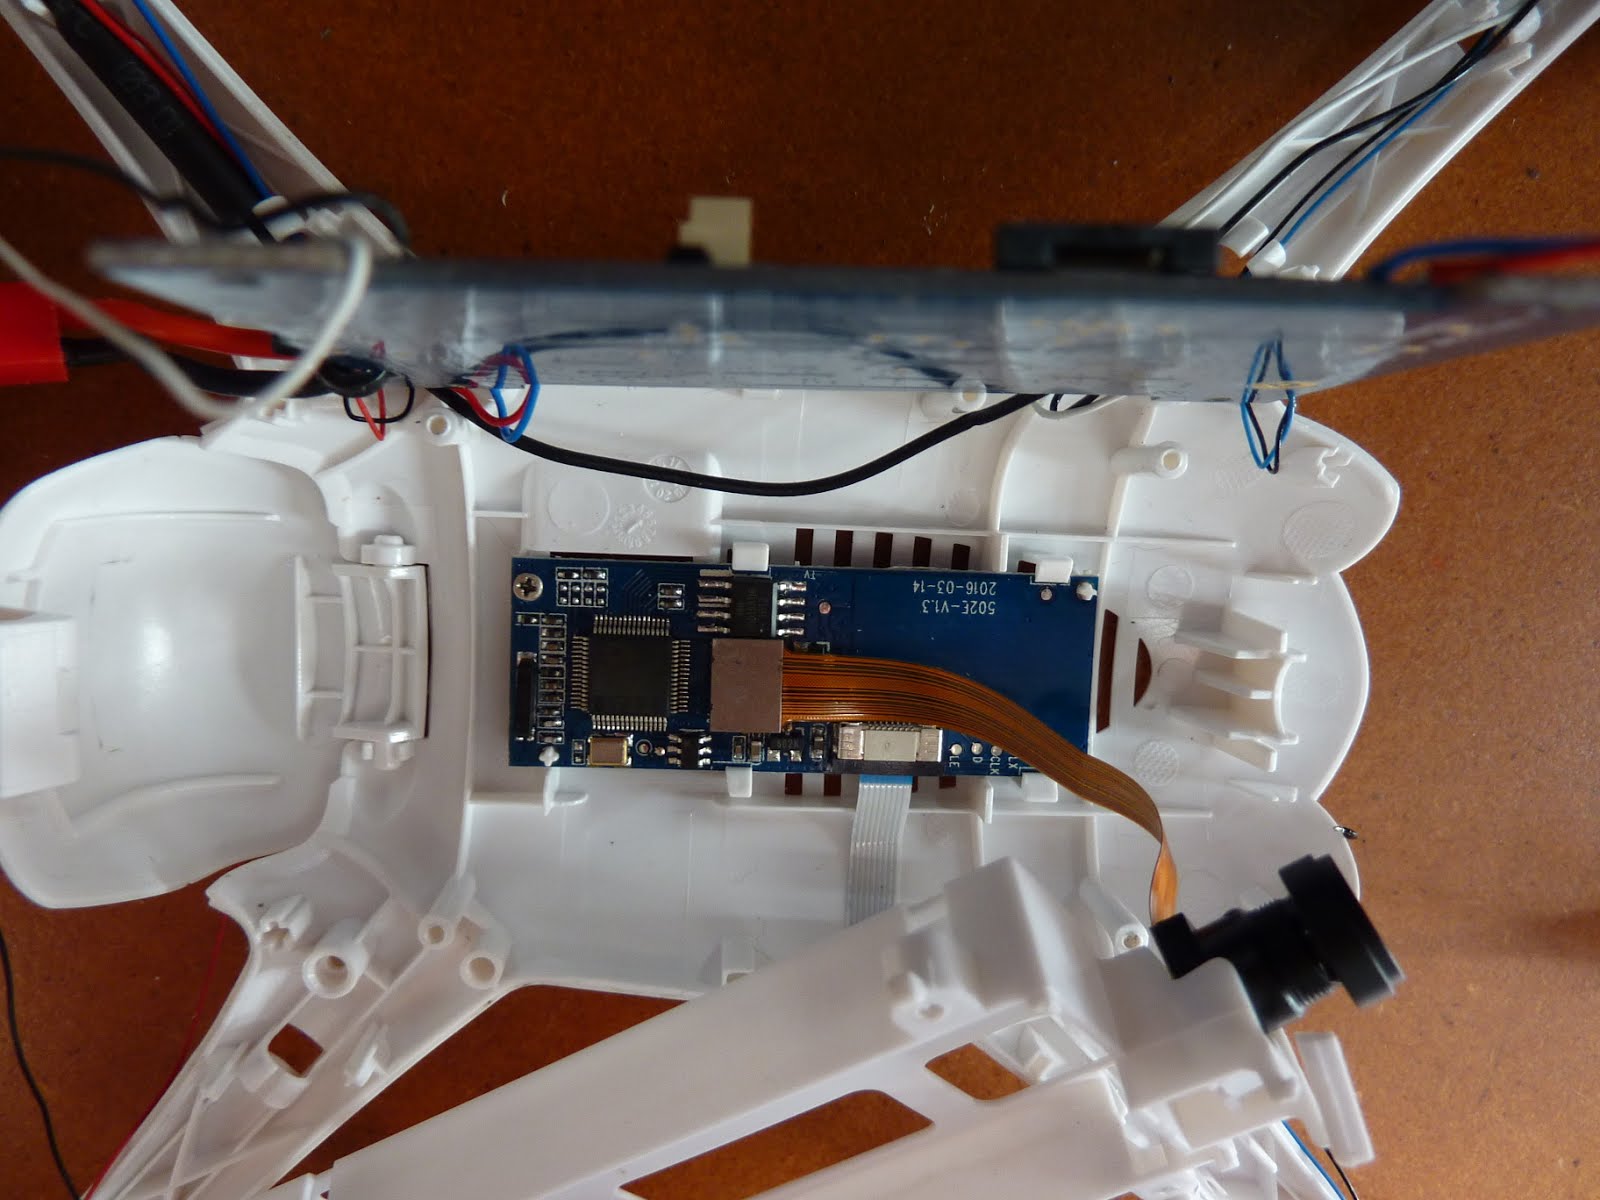
We need to unscrew and lift the control board up to gain access to the camera board. The motors and their mounts can be lifted from the case, but the leds are more awkward. Much easier to desolder them from the main board before continuing. Make a note, or use this photo, to record which coloured wires go where.

Remove the camera board connector and lift the control board to reveal the camera board underneath.
The Mate808 is easy to open. Remove it from the case and disconnect the battery from the board.
We need to prepare the board by soldering wires for the switches in parallel with the existing ones. I chose to mount an extra led in the quad's body as a recording indicator. I did try to remove the pcb led a few times but failed. Rather than risk damaging the board I soldered mine in parallel with the yellow Mate808 led so I had to choose a red one as this will light at a lower voltage than a yellow one. It will also be the brightest option.
The Mate808 has an internal 1s battery but the Hubsan is a 2s quad, so we need to reduce that voltage. I used a step down module from Bangood which isn't the smallest or the lightest option (1.6g) but it does the job nicely.
Take care to set the output voltage to 4 volts before soldering it to the Camera pcb.

In order to fit the camera board into the lower case of the quad we need to remove some of the plastic. Cut the old board's 4 retaining clips, then cut space for the usb socket and board components. Lastly make a diagonal cut for the micro SD card slot.
The main thing to concentrate on is allowing access to the card slot so it can slide in and out smoothly. The other cuts are just to allow the board to sit low and stable in the bottom of the case.

Next we need to mount the switches. I used some pcb switches as they were cheap and small. The base measures 6mm x 6mm and they are available in different lengths. When I ordered these I went for the 9.5mm ones but I ended up cutting and filing them down to be almost flush with the case so I could have got away with something smaller. Search ebay, amazon or your favourite store for "micro momentary switch" to locate these.

Drill 2 holes in the side of the body for the switches and one for the led. Take care to ensure they don't obstruct the quad's battery housing when in place. Drill from the outside and then remove the burrs with a knife or much larger drill bit turned by hand.

So that the board doesn't move when pressing the card in and out, I made a 'shelf' from hot glue by wrapping a thin plastic bag around the board, locating it correctly and then building up layers of hot glue to make a snug fitting shelf. I then removed the camera and trimmed the glue with a knife.
I also put a blob of glue to align with one of the holes in the camera board so that I could screw the board down (left hand blob of glue in this picture).

Place the board in the case, screw the corner down ensuring the micro SD card still slides in and out cleanly.
Solder the switches and led and locate the step down converter in front of the board. It fits at a slight incline but doesn't obstruct the battery housing. I placed some thin plastic between the converter and camera to prevent any accidental shorts.

Place the lens into the front of the battery housing as you replace it back in the case.


Lower the control board back into place and screw it down onto the battery housing.
Solder the step down converter to the quad's main power connections. Take care to heat these joints well and get the solder flowing. They will need much more heat than the other connections. Finally resolder the led wires.

Attach the top case by reconnecting the GPS connectors and screwing everything back together. And that's it, all finished.
Here's what the underneath should look like. An odd angle but perfectly functional and the quad now has a latching micro SD card slot.

A side view of the new buttons and led.

Comparison of old and new cameras.
This is a still from a video taken with the original camera. Pretty much everything is out of focus and the green hue is very noticeable.

And here is the Mate808 replacement. Again this is from a video but I've resized it to match the dimensions of the original camera. Apart from the much better quality, notice the field of view is narrower. Actually this picture doesn't do the camera justice. I took these videos before fitting the camera to do a side by side comparison and the Mate808 had some jello which you can see as blurs in the enlarged version of this picture. Take a look at the video below for a better idea of the quality.

As a result of the success of the project I've ordered a wide angle lens for the Mate808. I'm optimistic it will fit the red lens surround without any modifications but I'll post my results here when it arrives.
Video sample.
When I first tested the video in my garden all looked good but any flights higher than around 10 to 20 metres suffered from minor 'jello'. Not terrible but not great either. I'm not sure exactly why but some interaction of wind and propellers is my guess.I crudely balanced the propellers and discovered all of them needed some work. I don't have a balancer and used a small drill bit which I jiggled but the difference in jello is stark. I'm sure more accurate balancing is the key to getting the most stable recordings.
That's awesome :)
ReplyDeleteWow great job. So y 2 buttons? One for video and 2nd ??? I have a few KO key chain cameras but could never be sure what button to press.
ReplyDeleteOne button is on/off. The other one is start/stop video recording.
DeleteI think you can get power from H502e camera. (4.5v).
Deletenice
ReplyDeleteWow! This is a really useful info! :) Thanks! I've been thinking of replacing the lense, but this is even a better solution. As for the rest of the drone, and how to get much more familiar with its parts and how to tweek it, I've been using this article: http://mydronelab.com/reviews/hubsan-x4.html and it helped me a lot with the deatils of the parts. Check it out, you might also find it useful.
ReplyDeleteYes the camera is not very good on my H502e. In fact I am in the process right now of trying to refocus it. I'm coming to the conclusion that it will not get any sharper tweaking the focus. I've been running back and forth with the SD card from the dismembered quad pointed at the horizon to my computer seeing if a tiny turn this way or that will suddenly made it sharp. No deal. Your solution with the 808 is inviting me to try. Would be nice if there was a lens/ribbon replacement for the stock camera that would make it better. Thanks for your video and blog post. I own a Mate 808 with a 120 degree lens that I Velcro attached to another cheaper quad I have. It shows the props at the top of the frame. I don't much like that. I could change the mount and and angle it down on that quad since it's mounted on the bottom. However on the Hubsan H502e I don't know if it could easily be angled down further to avoid videoing the props spinning in the frame.
ReplyDeleteThis comment has been removed by a blog administrator.
ReplyDeleteGreat video!
ReplyDeleteAny idea if the ribbon connector on (the original camera board) between lens unit and the pcb is "detachable" or has it a permanent fit? I'm asking because i have the H502s with a faulty lens unit and was wondering if i could replace it with a an 808 lens unit. Thanks in advance
Thanks
ReplyDeleteThe camera of my Hubsan X4 has been performing poorly and I think it’s time I changed it. And your guide will certainly come in handy. Thanks for sharing. See more on the Hubsan X4 here: http://mydronelab.com/reviews/hubsan-x4.html
ReplyDelete